Set up a static website on AWS using S3, Route 53, CloudFront, and Certificate Manager
Here, we’ll set up a static website (think HTML and CSS and no moving parts) hosted on S3, which can be accessed by your own domain, domain.com, protected with SSL (think https:// instead of http://).
Anyone who types in domain.com on their browser will be forwarded to https://www.domain.com so that you can have that fancy “Your connection is secure” lock!

If you are completely new to AWS, I recommend you take a look at the Intro to AWS for Newbies eBook before you embark on this. If you just want to figure out how to create that static website, read on!
We will go over setting up the website where the domain name is registered through Route 53 and where it’s registered using a 3rd party registrar like Namecheap.
Setting up Website with domain registered at Route 53
Purchase domain in question using Route 53
- Go to Route 53 and purchase a new domain for $12 by following the prompts
- If you are purchasing your domain from another registrar, go to “Setting up Website with External Domain Registrar” at the bottom of this page, complete the steps, and come back to continue
Request SSL certificate from AWS Certificate Manager (ACM)
- Go to AWS Certificate Manager (ACM) and request a certificate for www.domain.com
- Include domain.com as another domain to protect with the same certification
- Select DNS Validation and validate via “Create record in Route 53“
- Confirm after 30 minutes or so that validation was completed
Create the website in S3
I went over how you can upload a static website on S3 here: How to host a Static Website with S3
- Go into S3 and create 2 buckets: domain.com and www.domain.com
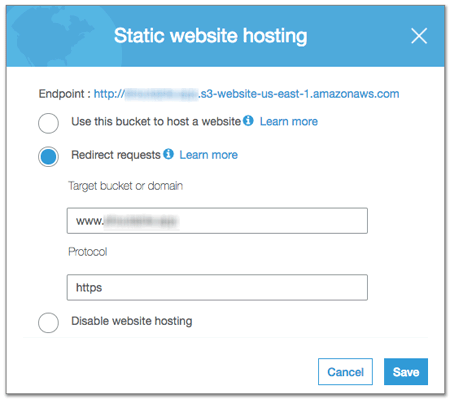
- Set domain.com S3 bucket to redirect to www.domain.com

- Protocol should be set to https
- The website will be hosted in the www.domain.com S3 bucket
- In the www.domain.com bucket, set Bucket Policy to THIS:
{

"Version":"2012-10-17",

"Statement":[{

"Sid":"PublicReadGetObject",

"Effect":"Allow",

"Principal": "*",

"Action":["s3:GetObject"],

"Resource":["arn:aws:s3:::www.domain.com/*"

]

}

]

}
Here’s AWS’s documentation on how this would work: Setting up a Static Website using Custom Domain
Create new CloudFront Distributions

- Go to CloudFront and create a new distribution
- Choose “Web” for delivery method
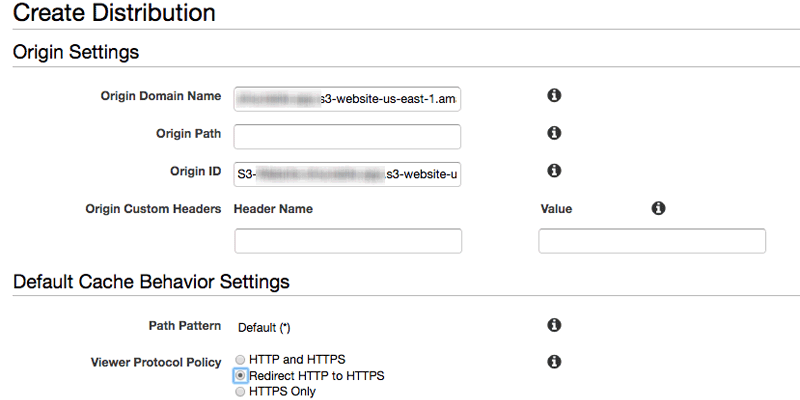
- Get the Endpoint URL for domain.com S3 bucket to set as Origin Domain Name instead of the bucket from the dropdown menu
- Go to… S3 -> Bucket Name -> Properties -> Static website hosting
- Looks something like: http://xyzwxyz-12rdklfj3e-us-east-1.s3-website-us-east-1.amazonaws.com

- Set the SSL cert to the certificate just verified with ACM
- Make all HTTP redirect to HTTPS
- Enter domain.com as CNAME
- Leave everything else as default
- This will also take a while to go through
- Create another CloudFront distribution for www.domain.com with same settings
- Enter www.domain.com as CNAME
Here’s AWS’s documentation on how to create this distribution: Speed Up Your Website with Amazon CloudFront
Create A records in Route 53
Go back to Route 53 and create A Records to point to the new CloudFront distributions.
- Create A record for domain.com and point it to the CloudFront distribution for domain.com
- Create A record for www.domain.com and point it to the CloudFront distribution for www.domain.com
- Both can be found in the dropdown under “alias”
Here’s AWS’s documentation on how this works: Using Route 53 for DNS
Setting up Website with External Domain Registrar
Sometimes, the domain extension is not a TLD supported by AWS, so we register using 3rd party like Namecheap. Or you just bought your domain at another registrar, and don’t want to transfer it over to AWS because it’s cheaper.
-
- Purchase domain in question at the 3rd party registrar
- Go to Route 53 and create a new Hosted Zone for domain.com
- Copy over the Name Server (NS) values (there are 4 of them) from Route 53’s Hosted Zone into the domain registrar’s DNS server settings
- Go back up to the previous section and pick back up at “Request SSL Certificate from ACM“
And that’s it! You can replace the S3 with an EC2 instance, and create the same set up for WordPress if you’d like!
Here’s a tutorial on how you can create a WordPress site on EC2: How to set up a WordPress site on EC2
What Does the Architecture Look Like?
I was streaming this setup on Twitch, and I realized it’ll be nice to have a diagram of the architecture of what we’re building!
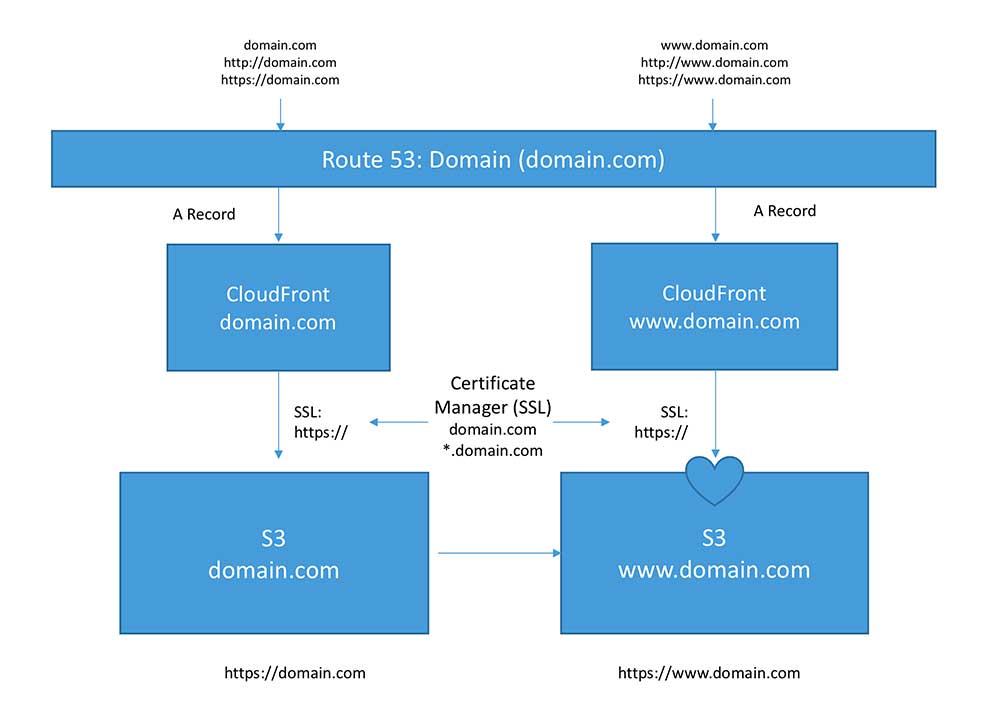
We’ve set up 2 sets of CloudFront distributions and S3 buckets to route all different kinds of traffic to all eventually end up at https://www.domain.com.
Below, you can see how the redirects are working for all different ways someone might try to access your website using different combinations of www. and http:// and https://.

I have been struggling with this for awhile and learning a lot in the process. The tricky parts for me have been with the certificate, Route53 and CloudFront parts. Requesting the cert is easy but if you follow the little hints in the wizard, it seems convenient to use *.domain.com to cover all subdomains in one sweep. If you do that, you must use that exact syntax as your CNAME in CloudFront. I had several errors before getting my first Distribution to complete. It also seemed like I had to get a cert in the same us-east-1 region as CloudFront. My normal region so far has been us-east-2 (ohio).
It was also quirky the first time when the cert manager didn’t offer me the option to create a Route53 CNAME record and I just chose Continue. I went back and forth a few times between various service management pages before this came together.
Finally, in this tutorial it says to host the website in the http://www.domain.com bucket but the AWS tutorial says to host it in the root domain bucket and set the subdomain (www.domain.com) to redirect to the root. I guess it would work either way but if you add subdomains, it makes more sense that they all point back to the root.
Thanks for being helpful in this arduous but rewarding journey to take my on-prem skillset into the cloud!