Best way to learn a system is to use it! To help me study for my Certified Cloud Practitioner exam, I decided to set up a blog to chronicle my study journey using WordPress.
To do this, I set up a WordPress website on EC2. Follow along to get your own WordPress site running on AWS up in half an hour!
This WordPress Site
Of course, this blog is running on AWS! Woohoo! My very first live site running on AWS!
The WordPress site is hosted on EC2, and I’ve purchased awsnewbies.com from Route 53.
The whole set up (including fiddling around with WordPress themes and settings) and researching when I ran into issues took about 2 hours, but since I’ve laid everything out here for you to follow in order, it should take you much less time!
How to Set Up a WordPress Site on EC2
Quick Resources
Here are the resources I used to get this blog up and running:
- Launch a WordPress Website with Amazon EC2 (AWS)
- Register a Domain Name with Amazon Route 53 (AWS)
- Connecting with an SSH Client on Linux and Mac OS (Bitnami)
- How to Remove the Bitnami Banner (Bitnami)
Step 1: Launch EC2 Instance, Install WordPress
I launched an EC2 Instance using “WordPress powered by Bitnami” AIM. Make sure that in the process of creating your EC2 instance that you download the Key File (.pem) and keep it in safe place
Refer to AWS KB: Launch a WordPress Website with Amazon EC2
After the instance is up and running, I SSH’d into the server in order to retrieve the default credentials.
Go to your EC2 instance in AWS console, and retrieve the Public IP address of the EC2 instance. In the “Descriptions” section of your EC2 instance’s information, the Public IP address is labeled “IPv4 Public IP.”
You can access your WordPress website by typing in the IP address into your browser!
To log into the admin console, you need to SSH into the server in order to retrieve the default credentials, or find it in your EC2’s System Log (refer to Step 3 in AWS’s article).
Via SSH
To SSH into your server on a Mac or Linux device, open Terminal, and type in:
cd Downloads// or where ever you saved the Key File
chmod 600 [KeyFile Name].pem
ssh -i [Keyfile Name].pem bitnami@[Public IP]
The KB I linked above will also show you how to SSH into a Windows Device, and also how to retrieve the username and password for your WordPress instance.
Via AWS Console
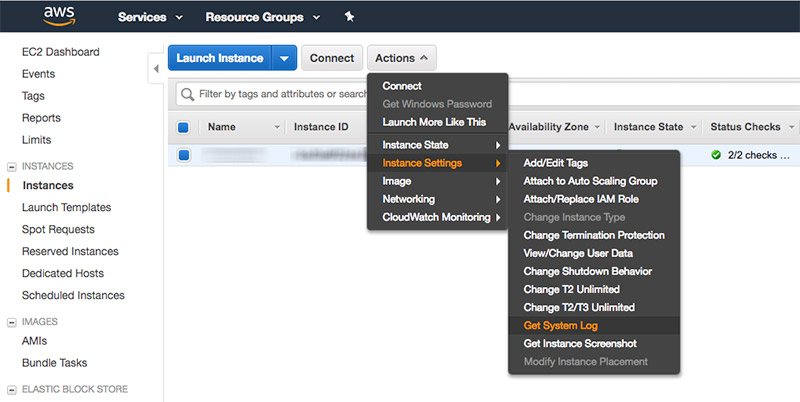
To find the same information through the AWS Console, go to your EC2 Instance, click on Actions > Instance Settings > Get System Log. This will bring up a prompt where you can scroll around to find this information.
You can use the username (I believe for Bitnami the default username is “user”) and password to log in to your WordPress Dashboard by going to [Your IP Address]/wp-admin (for example, 23.344.5665/wp-admin).
Step 2: Register a Domain on Route 53
Registering a domain on Route 53 is as easy as can be! You search for a domain name you want, make sure it’s available, and AWS helps you purchase it!
It took less than 30 minutes for me to actually be in the possession of my new domain name after I paid $12 to register it!
Refer to AWS KB: Register a Domain Name with Amazon Route 53
Step 3: Associate EC2 Instance with Elastic IP
Now that you have a domain name, you need to attach it to your EC2 instance so that when someone goes to YourDomain.com, it’ll reroute them to your WordPress site.
First thing you need to do – I didn’t do this and it didn’t work, so it’s important! – is to create an Elastic IP for your EC2 instance.
Go back to your EC2 dashboard, and find Elastic IPs (under “Network & Security” on the left hand navigation).
Click on Allocate New Address, and create a new Elastic IP. Once it’s created, select the new IP address, and click on Actions > Associate Address.
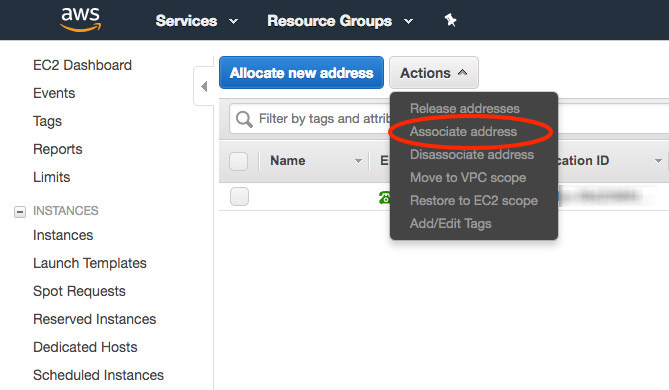
Associate the new IP address with the EC2 instance you’ve created for the WordPress site. Note the IP address for the Elastic IP, as you’ll be using it next.
Step 4: Map Domain Name to EC2
Once the Elastic IP is associated with your WordPress site, you need to go back into Route 53.
Find Domains > Registered Domains from the left hand navigation, so that we can finally associate the domain name with the Elastic IP (which is already associated with your WordPress EC2 instance).
Click on the domain name to be taken to a page filled with registration information about the domain (should match up with what you filled out to purchase it earlier).
Click on Manage DNS button up top. Click on the domain name again, and you’ll then be taken to a page filled with routing rules for the domain name.
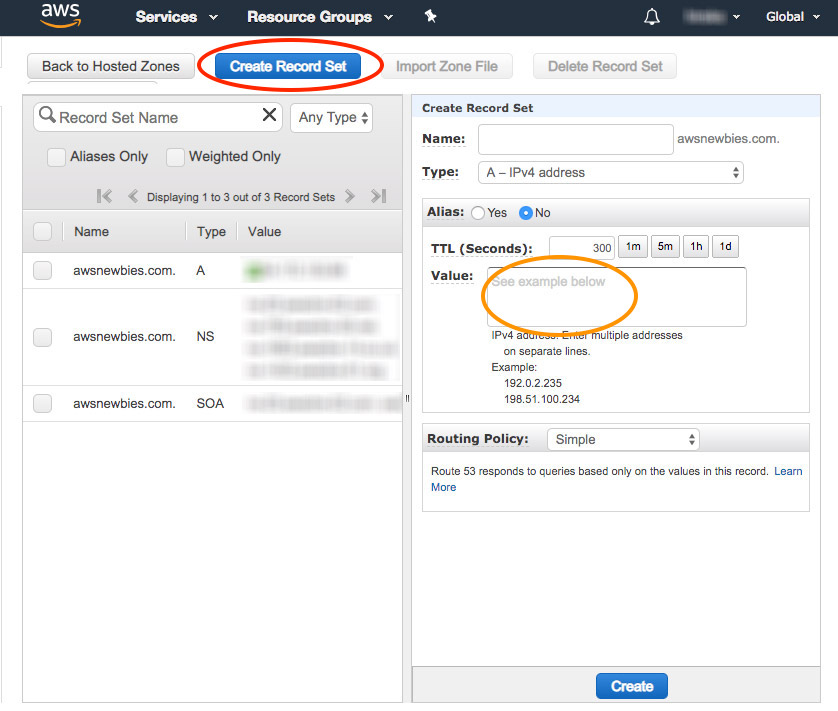
Click on Create Record Set, and create an “A – IPv4 address” record set.
You can leave the name box blank (unless you want your WordPress site to live on a subdomain, like blog.yourdomain.com instead of yourdomain.com).
Leave all the options default (like TTL, Alias, and Routing Policy), and fill out the Elastic IP address in the Value box.
You’ll have to wait anywhere from a few minutes to a full day for the DNS to update and yourdomain.com starts routing to your EC2 instance’s IP address.
For me, it took less than 5 minutes for the domain name to start rerouting to the WordPress site.
Step 5: Edit WordPress
Now that your domain name routes to your EC2 instance, you can access your new WordPress website via the domain name. In my case, its http://awsnewbies.com.
You can also log into your WordPress Dashboard by going to [Domain Name]/wp-admin.
Log back into your WordPress dashboard to pick a new theme, configure your settings, and add some personality!
Step 6: Remove the Bitnami Logo
 When you install WordPress instance using Bitnami, it adds an “Info Page” link to the bottom right corner of the screen.
And it’s was a bit of a pain to remove.
To remove the banner from the website, you have to SSH back into the server, and run this command in the home directory:
sudo touch /opt/bitnami/apps/bitnami/banner/disable-banner
This command was provided on StackOverflow by a Bitnami developer. There is an “official” way to do this via SSH, but it didn’t work for me.
Step 7: Publish a Blog Post!
Edit your Pages, publish a blog post, and you’re done! You’ve officially set up your WordPress site running on EC2! Congratulations!
This post was also my first blog post on a website hosted on AWS, and it feels pretty snazzy! (Dunno how snazzy I’ll fee after I start getting the bills though… That’s TBD.)
Want to Host a Static Website on AWS?
Check out 5 minute tutorial on uploading your static website on S3:
Hey. Congrats on your website. So which EC2 instance did you choose to build your webserver? How much do you pay monthly for you website? Thanks!
Hey Raj, I chose the free one in the AWS Free Tier, so the website is free! 🙂